Building a Video Chat App with Vuejs and Golang
It has become very clear that the future of work will be fully remote or a hybrid. A lot of companies would have to use or develop tools to enhance their communication and provide services to their customers.
In this article we will demonstrate how easy it is to build a video chat application with 100ms SDKs in VueJs3 (using TypeScript) and Netlify functions in Golang. Tailwindcss will be used for the styles.
Requirements
- 100ms.live account. Get your
APP_ACCESS_KEYandAPP_SECRETfrom your dashboard. - A fair understanding of VueJs3 using the composition API.
- A fair understanding of Golang and Netlify functions. Install the Netlify command line tool.
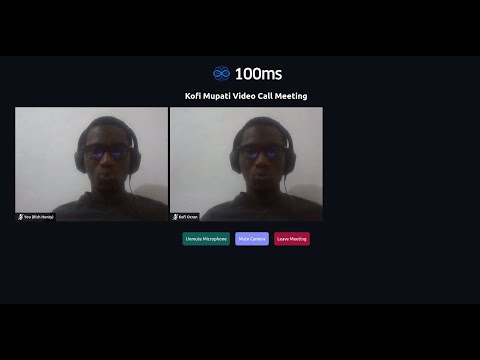
The Application Features
- Creating a Room for the video chat using the 100ms rooms endpoints.
- Generating an app token to join the video chat.
- Muting and unmuting the audio and video for both Local and Remote Peers.
- Displaying appropriate user interface for the on and off states of the audio and video.
Project Setup
- Create a new VueJs3 application using ViteJs with TypeScript template.
npm init vite@latest vue-video-chat --template vue-ts
cd vue-video-chat
npm install- Initialize a new Netlify app inside the application. Follow the prompts after running the following command:
ntl init- Install 100ms JavaScript SDKs and project dependencies.
For Tailwindcss follow this installation guide
# 100ms SDKs
npm install @100mslive/hms-video
npm install @100mslive/hms-video-store

# Axios for Ajax requests
npm install axios

# Setup tailwindcss for styling.(https://tailwindcss.com/docs/guides/vite)

# Additional tailwind plugin
npm install @tailwindcss/forms- Add a netlify.toml file and add the path to the functions directory.
touch netlify.toml

# Add the following to the file

[functions]
directory = "hms-functions/"- Create 2 netlify functions: createRoom and generateAppToken inside a directory named hms-functions
# inside the root directory of the project i.e vue-video-chat

mkdir hms-functions
cd hms-functions
ntl functions:create --name="createRoom"
ntl functions:create --name="generateAppToken"
The Back-end/API
We create endpoints with Netlify Lambda Functions which will be executed to create the room and generate app tokens.
Room Creation Endpoint
Navigate to the createRoom directory and install the following external libraries.
cd hms-functions/createRoom

go get github.com/golang-jwt/jwt/v4 v4.2.0
go get github.com/google/uuid v1.3.0

go mod tidy
This endpoint accepts the following params:
- name: The name of the user. This is just used to set the description of the created room. This is optional. It's just added for this project and use case.
- room: The name to be given to the created room. When a name is not supplied to the rooms endpoint, a room name is generated for you.
The endpoint does the following:
- Generates a management token in the generateManagementToken function. This token is passed as an Authorization header when hitting the rooms endpoint.
- Creates a room using the given params above and the management token. It returns the object for a created room when successful.
Add the following to hms-functions/createRoom/main.go
package main

import (
	"bytes"
	"context"
	"encoding/json"
	"errors"
	"io/ioutil"
	"net/http"
	"strings"
	"time"

	"os"

	"github.com/aws/aws-lambda-go/events"
	"github.com/aws/aws-lambda-go/lambda"
	"github.com/golang-jwt/jwt/v4"
	"github.com/google/uuid"
)

type RequestBody struct {
	Username string `json:"name"`
	Room     string `json:"room"`
}

func generateManagementToken() string {
	appAccessKey := os.Getenv("APP_ACCESS_KEY")
	appSecret := os.Getenv("APP_SECRET")

	mySigningKey := []byte(appSecret)
	expiresIn := uint32(24 * 3600)
	now := uint32(time.Now().UTC().Unix())
	exp := now + expiresIn
	token := jwt.NewWithClaims(jwt.SigningMethodHS256, jwt.MapClaims{
		"access_key": appAccessKey,
		"type":       "management",
		"version":    2,
		"jti":        uuid.New().String(),
		"iat":        now,
		"exp":        exp,
		"nbf":        now,
	})

	// Sign and get the complete encoded token as a string using the secret
	signedToken, _ := token.SignedString(mySigningKey)
	return signedToken
}

func handleInternalServerError(errMessage string) (*events.APIGatewayProxyResponse, error) {
	err := errors.New(errMessage)
	return &events.APIGatewayProxyResponse{
		StatusCode: http.StatusInternalServerError,
		Headers:    map[string]string{"Content-Type": "application/json"},
		Body:       "Internal server error",
	}, err
}

func handler(ctx context.Context, request events.APIGatewayProxyRequest) (*events.APIGatewayProxyResponse, error) {

	var f RequestBody
	managementToken := generateManagementToken()

	b := []byte(request.Body)
	err1 := json.Unmarshal(b, &f)
	if err1 != nil {
		return &events.APIGatewayProxyResponse{
			StatusCode: http.StatusUnprocessableEntity,
		}, errors.New("Provide name and room in the request body")
	}

	postBody, _ := json.Marshal(map[string]interface{}{
		"name":        strings.ToLower(f.Room),
		"description": "This is a secret room created by " + f.Username,
		"active":      true,
	})
	payload := bytes.NewBuffer(postBody)

	roomUrl := os.Getenv("ROOM_URL")
	method := "POST"

	client := &http.Client{}
	req, err := http.NewRequest(method, roomUrl, payload)

	if err != nil {
		return handleInternalServerError(err.Error())
	}
	// Add Authorization header
	req.Header.Add("Authorization", "Bearer "+managementToken)
	req.Header.Add("Content-Type", "application/json")

	// Send HTTP request
	res, err := client.Do(req)
	if err != nil {
		return handleInternalServerError(err.Error())
	}
	defer res.Body.Close()

	resp, err := ioutil.ReadAll(res.Body)

	if err != nil {
		return handleInternalServerError(err.Error())
	}

	return &events.APIGatewayProxyResponse{
		StatusCode:      res.StatusCode,
		Headers:         map[string]string{"Content-Type": "application/json"},
		Body:            string(resp),
		IsBase64Encoded: false,
	}, nil
}

func main() {
	lambda.Start(handler)
}
Token Generation Endpoint
Navigate to the generateAppToken directory and install the following external libraries:
cd hms-functions/generateAppToken

go get github.com/golang-jwt/jwt/v4 v4.2.0
go get github.com/google/uuid v1.3.0

go mod tidy
This endpoint accepts the following params:
- user_id: This is a field inside the room creation response object.
- room_id: The name used for creating the room.
- role: The role you want to assign to a user join the video chat.
The following code accepts the params listed above and returns a JWT token with a 1-day expiration period which will be used when joining a video call.
Add the following code to hms-functions/generateAppToken/main.go:
package main

import (
	"context"
	"encoding/json"
	"errors"
	"net/http"
	"os"
	"time"

	"github.com/aws/aws-lambda-go/events"
	"github.com/aws/aws-lambda-go/lambda"
	"github.com/golang-jwt/jwt/v4"
	"github.com/google/uuid"
)

type RequestBody struct {
	UserId string `json:"user_id"`
	RoomId string `json:"room_id"`
	Role   string `json:"role"`
}

func handler(ctx context.Context, request events.APIGatewayProxyRequest) (*events.APIGatewayProxyResponse, error) {

	var f RequestBody

	b := []byte(request.Body)
	err1 := json.Unmarshal(b, &f)
	if err1 != nil {
		return &events.APIGatewayProxyResponse{
			StatusCode: http.StatusUnprocessableEntity,
		}, errors.New("Provide user_id, room_id and room in the request body")
	}

	appAccessKey := os.Getenv("APP_ACCESS_KEY")
	appSecret := os.Getenv("APP_SECRET")

	mySigningKey := []byte(appSecret)
	expiresIn := uint32(24 * 3600)
	now := uint32(time.Now().UTC().Unix())
	exp := now + expiresIn
	token := jwt.NewWithClaims(jwt.SigningMethodHS256, jwt.MapClaims{
		"access_key": appAccessKey,
		"type":       "app",
		"version":    2,
		"room_id":    f.RoomId,
		"user_id":    f.UserId,
		"role":       f.Role,
		"jti":        uuid.New().String(),
		"iat":        now,
		"exp":        exp,
		"nbf":        now,
	})

	// Sign and get the complete encoded token as a string using the secret
	signedToken, err := token.SignedString(mySigningKey)

	if err != nil {
		return &events.APIGatewayProxyResponse{
			StatusCode: http.StatusInternalServerError,
			Headers:    map[string]string{"Content-Type": "application/json"},
			Body:       "Internal server error",
		}, err
	}

	return &events.APIGatewayProxyResponse{
		StatusCode:      http.StatusOK,
		Headers:         map[string]string{"Content-Type": "application/json"},
		Body:            signedToken,
		IsBase64Encoded: false,
	}, nil
}

func main() {
	lambda.Start(handler)
}
The Front-end
The front-end is made up of a form where users will enter some their details to join a room and where their video and audio streams will be displayed when they successfully join the same room for the video chat.
Utility functions to make the API requests.
- Create types.ts to contain our type definitions
//inside the project's root directory

touch src/types.ts

// Add the following code to types.ts

export type HmsTokenRes = {
  user_id: String;
  room_id: String;
  authToken: String;
};- Create hms.ts which will contain the utility functions and initiate 100ms SDK instances.
We initialize the HMSReactiveStore instance and create the following:
hmsStore: For accessing all the states in the video call.hmsActions: For performing all actions provided by the HMSReactiveStore instance we created.FUNCTION_BASE_URL: The base url for hitting the Netlify functions.fetchTokens: This function is used for creating the room followed by generating the authToken which will be used when joining the video chat.
We set the role to host. The default roles available on the 100ms dashboard are host and guest. The role determines which actions a particular user can perform.
// Create hms.ts file
touch src/hms.ts

// Add the following code to hms.ts

import axios from "axios";
import { HMSReactiveStore } from "@100mslive/hms-video-store";
import { HmsTokenRes } from "./types";

const FUNCTION_BASE_URL = "/.netlify/functions";
const hmsManager = new HMSReactiveStore();

export const hmsStore = hmsManager.getStore();
export const hmsActions = hmsManager.getActions();

export const fetchTokens = async (
  name: string,
  room: string
): Promise<HmsTokenRes | any> => {
  try {
    // create or fetch the room_id
    const roomRes = await axios.post(
      `${FUNCTION_BASE_URL}/createRoom`,
      { name, room },
      {
        headers: {
          "Content-Type": "application/json",
        },
      }
    );

    const { data } = roomRes;

    // Generate the app/authToken
    const tokenRes = await axios.post(
      `${FUNCTION_BASE_URL}/generateAppToken`,
      {
        user_id: data.user,
        room_id: data.id,
        role: "host",
      },
      {
        headers: {
          "Content-Type": "application/json",
        },
      }
    );

    return {
      user_id: data.user,
      room_id: data.id,
      authToken: tokenRes.data,
    };
  } catch (error: any) {
    throw error;
  }
};- Add a form where users enter their details to join the video chat in a file named: Join.vue

This is a simple form where users enter their username and the room they want to join for the video call.
joinHmsRoom: This function calls thefetchTokensmethod and uses the response to join the room withhmsActions.joinmethod. All users who join have their audio muted by default as we have setisAudioMuted: true.
# Create Join.vue
touch src/components/Join.vue
Add the following to Join.vue
<script setup lang="ts">
import { reactive, ref } from "vue";
import { fetchTokens, hmsActions } from "../hms";

const defaultRoomName = import.meta.env.VITE_APP_DEFAULT_ROOM;
const isLoading = ref(false);
const formData = reactive({
  name: "",
  room: `${defaultRoomName}`,
});

const joinHmsRoom = async () => {
  try {
    isLoading.value = true;
    const res = await fetchTokens(formData.name, formData.room);

    hmsActions.join({
      userName: formData.name,
      authToken: res.authToken,
      settings: {
        isAudioMuted: true, // Join with audio muted
      },
    });
  } catch (error) {
    alert(error);
  }

  isLoading.value = false;
};
</script>

<template>
  <div class="mt-8 sm:mx-auto sm:w-full sm:max-w-md">
    <div class="bg-white py-10 px-5 shadow sm:rounded-lg sm:px-10">
      <form class="space-y-6" @submit.prevent="joinHmsRoom">
        <div>
          <label for="name" class="block text-sm font-2xl text-gray-700">
            Name
          </label>
          <div class="mt-1">
            <input
              id="name"
              name="name"
              type="text"
              autocomplete="username"
              required
              v-model="formData.name"
              class="
                appearance-none
                block
                w-full
                px-3
                py-2
                border border-gray-300
                rounded-md
                shadow-sm
                placeholder-gray-400
                focus:outline-none focus:ring-indigo-500 focus:border-indigo-500
                sm:text-sm
              "
            />
          </div>
        </div>

        <div>
          <label for="room" class="block text-sm font-medium text-gray-700">
            Room
          </label>
          <div class="mt-1">
            <input
              id="room"
              name="room"
              type="text"
              required
              disabled
              v-model="formData.room"
              class="
                appearance-none
                block
                w-full
                px-3
                py-2
                border border-gray-300
                rounded-md
                shadow-sm
                placeholder-gray-400
                focus:outline-none focus:ring-indigo-500 focus:border-indigo-500
                sm:text-sm
                disabled:cursor-not-allowed
              "
            />
          </div>
        </div>

        <div>
          <button
            type="submit"
            :disabled="formData.name === '' || isLoading"
            :class="{ 'cursor-not-allowed': isLoading }"
            class="
              w-full
              flex
              justify-center
              py-2
              px-4
              border border-transparent
              rounded-md
              shadow-sm
              text-sm
              font-medium
              text-white
              bg-indigo-600
              hover:bg-indigo-700
              focus:outline-none
              focus:ring-2
              focus:ring-offset-2
              focus:ring-indigo-500
            "
          >
            <svg
              class="animate-spin mr-3 h-5 w-5 text-white"
              xmlns="http://www.w3.org/2000/svg"
              fill="none"
              viewBox="0 0 24 24"
              v-if="isLoading"
            >
              <circle
                class="opacity-25"
                cx="12"
                cy="12"
                r="10"
                stroke="currentColor"
                stroke-width="4"
              ></circle>
              <path
                class="opacity-75"
                fill="currentColor"
                d="M4 12a8 8 0 018-8V0C5.373 0 0 5.373 0 12h4zm2 5.291A7.962 7.962 0 014 12H0c0 3.042 1.135 5.824 3 7.938l3-2.647z"
              ></path>
            </svg>

            {{ isLoading ? "Joining..." : "Join" }}
          </button>
        </div>
      </form>
    </div>
  </div>
</template>- Create the component where the video streams will be displayed named: Conference.vue
The hmsStore as I mentioned earlier contains the various states provided by 100ms for a video chat.
The subscribe method provides a very easy way to get the value for the various states. All you need to do is subscribe a state and attach a handler function to process the state changes from the given selector.
hmsStore.getState also accepts a state selector to get the value at a point in time but it is not reactive and does detect state changes hence the need to use hmsStore.subscribe to detect state changes.
We use selectors to determine the audio and video states for the Local and Remote Peers.
Explanation of the various methods used:
onAudioChange: A handler for changes in the audio state of the Local Peer.onVideoChange: A handler for changes in the video state of the Local Peer.onPeerAudioChange: A handler for changes in the audio state of a Remote Peer.onPeerVideoChange: A handler for changes in the video state of a Remote Peer.toggleAudio&toggleVideo: Turning the Local Peer's microphone and camera on and off respectively.renderPeers: This is a handler that detects Peer addition and removal via theselectPeersselector.
For every peer that connects, their video stream is displayed with thehmsActions.attachVideomethod.- For a RemotePeer, we subscribe to their audio and video states with the
selectIsPeerAudioEnabledandselectIsPeerVideoEnabledselectors and their respective handlers. The detected changes trigger the respective UI change.
touch src/components/Conference.vueAdd the following to Conference.vue:
<script setup lang="ts">
import { ref, reactive, onUnmounted } from "vue";
import {
  selectPeers,
  HMSPeer,
  HMSTrackID,
  selectIsLocalAudioEnabled,
  selectIsLocalVideoEnabled,
  selectIsPeerAudioEnabled,
  selectIsPeerVideoEnabled,
} from "@100mslive/hms-video-store";
import { hmsStore, hmsActions } from "../hms";

const videoRefs: any = reactive({});
const remotePeerProps: any = reactive({});
const allPeers = ref<HMSPeer[]>([]);
const isAudioEnabled = ref(hmsStore.getState(selectIsLocalAudioEnabled));
const isVideoEnabled = ref(hmsStore.getState(selectIsLocalVideoEnabled));

enum MediaState {
  isAudioEnabled = "isAudioEnabled",
  isVideoEnabled = "isVideoEnabled",
}

onUnmounted(() => {
  if (allPeers.value.length) leaveMeeting();
});

const leaveMeeting = () => {
  hmsActions.leave();
};

const onAudioChange = (newAudioState: boolean) => {
  isAudioEnabled.value = newAudioState;
};
const onVideoChange = (newVideoState: boolean) => {
  isVideoEnabled.value = newVideoState;
};

const onPeerAudioChange = (isEnabled: boolean, peerId: string) => {
  if (videoRefs[peerId]) {
    remotePeerProps[peerId][MediaState.isAudioEnabled] = isEnabled;
  }
};
const onPeerVideoChange = (isEnabled: boolean, peerId: string) => {
  if (videoRefs[peerId]) {
    remotePeerProps[peerId][MediaState.isVideoEnabled] = isEnabled;
  }
};

const renderPeers = (peers: HMSPeer[]) => {
  allPeers.value = peers;
  peers.forEach((peer: HMSPeer) => {
    if (videoRefs[peer.id]) {
      hmsActions.attachVideo(peer.videoTrack as HMSTrackID, videoRefs[peer.id]);

      // If the peer is a remote peer, attach a listener to get video and audio states
      if (!peer.isLocal) {
        // Set up a property to track the audio and video states of remote peer so that
        if (!remotePeerProps[peer.id]) {
          remotePeerProps[peer.id] = {};
        }
        remotePeerProps[peer.id][MediaState.isAudioEnabled] = hmsStore.getState(
          selectIsPeerAudioEnabled(peer.id)
        );
        remotePeerProps[peer.id][MediaState.isVideoEnabled] = hmsStore.getState(
          selectIsPeerVideoEnabled(peer.id)
        );

        // Subscribe to the audio and video changes of the remote peer
        hmsStore.subscribe(
          (isEnabled) => onPeerAudioChange(isEnabled, peer.id),
          selectIsPeerAudioEnabled(peer.id)
        );
        hmsStore.subscribe(
          (isEnabled) => onPeerVideoChange(isEnabled, peer.id),
          selectIsPeerVideoEnabled(peer.id)
        );
      }
    }
  });
};

const toggleAudio = async () => {
  const enabled = hmsStore.getState(selectIsLocalAudioEnabled);
  await hmsActions.setLocalAudioEnabled(!enabled);
};

const toggleVideo = async () => {
  const enabled = hmsStore.getState(selectIsLocalVideoEnabled);
  await hmsActions.setLocalVideoEnabled(!enabled);
  // rendering again is required for the local video to show after turning off
  renderPeers(hmsStore.getState(selectPeers));
};

// HMS Listeners
hmsStore.subscribe(renderPeers, selectPeers);
hmsStore.subscribe(onAudioChange, selectIsLocalAudioEnabled);
hmsStore.subscribe(onVideoChange, selectIsLocalVideoEnabled);
</script>

<template>
  <main class="mx-10 min-h-[80vh]">
    <div class="grid grid-cols-2 gap-2 sm:grid-cols-3 lg:grid-cols-3 my-6">
      <div v-for="peer in allPeers" :key="peer.id" class="relative">
        <video
          autoplay
          :muted="peer.isLocal"
          playsinline
          class="h-full w-full object-cover"
          :ref="
            (el) => {
              if (el) videoRefs[peer.id] = el;
            }
          "
        ></video>
        <p
          class="
            flex
            justify-center
            items-center
            py-1
            px-2
            text-sm
            font-medium
            bg-black bg-opacity-80
            text-white
            pointer-events-none
            absolute
            bottom-0
            left-0
          "
        >
          <span
            class="inline-block w-6"
            v-show="
              (peer.isLocal && isAudioEnabled) ||
              (!peer.isLocal &&
                remotePeerProps?.[peer.id]?.[MediaState.isAudioEnabled])
            "
          >
            <svg viewBox="0 0 32 32" xmlns="http://www.w3.org/2000/svg">
              <path
                stroke="#FFF"
                fill="#FFF"
                d="m23 14v3a7 7 0 0 1 -14 0v-3h-2v3a9 9 0 0 0 8 8.94v2.06h-4v2h10v-2h-4v-2.06a9 9 0 0 0 8-8.94v-3z"
              />
              <path
                stroke="#FFF"
                fill="#FFF"
                d="m16 22a5 5 0 0 0 5-5v-10a5 5 0 0 0 -10 0v10a5 5 0 0 0 5 5z"
              />
              <path d="m0 0h32v32h-32z" fill="none" />
            </svg>
          </span>
          <span
            class="inline-block w-6"
            v-show="
              (peer.isLocal && !isAudioEnabled) ||
              (!peer.isLocal &&
                !remotePeerProps?.[peer.id]?.[MediaState.isAudioEnabled])
            "
          >
            <svg viewBox="0 0 32 32" xmlns="http://www.w3.org/2000/svg">
              <path
                fill="#FFF"
                d="m23 17a7 7 0 0 1 -11.73 5.14l1.42-1.41a5 5 0 0 0 8.31-3.73v-4.58l9-9-1.41-1.42-26.59 26.59 1.41 1.41 6.44-6.44a8.91 8.91 0 0 0 5.15 2.38v2.06h-4v2h10v-2h-4v-2.06a9 9 0 0 0 8-8.94v-3h-2z"
              />
              <path
                fill="#FFF"
                d="m9 17.32c0-.11 0-.21 0-.32v-3h-2v3a9 9 0 0 0 .25 2.09z"
              />
              <path fill="#FFF" d="m20.76 5.58a5 5 0 0 0 -9.76 1.42v8.34z" />
              <path d="m0 0h32v32h-32z" fill="none" />
            </svg>
          </span>
          <span class="inline-block">
            {{ peer.isLocal ? `You (${peer.name})` : peer.name }}</span
          >
        </p>

        <p
          class="text-white text-center absolute top-1/2 right-0 left-0"
          v-show="
            (peer.isLocal && !isVideoEnabled) ||
            (!peer.isLocal &&
              !remotePeerProps?.[peer.id]?.[MediaState.isVideoEnabled])
          "
        >
          Camera Off
        </p>
      </div>
    </div>

    <div
      class="mx-auto mt-10 flex items-center justify-center"
      v-if="allPeers.length"
    >
      <button
        class="bg-teal-800 text-white rounded-md p-3 block"
        @click="toggleAudio"
      >
        {{ isAudioEnabled ? "Mute" : "Unmute" }} Microphone
      </button>
      <button
        class="bg-indigo-400 text-white rounded-md p-3 block mx-5"
        @click="toggleVideo"
      >
        {{ isVideoEnabled ? "Mute" : "Unmute" }} Camera
      </button>
      <button
        class="bg-rose-800 text-white rounded-md p-3 block"
        @click="leaveMeeting"
      >
        Leave Meeting
      </button>
    </div>
    <div v-else>
      <p class="text-white text-center font-bold text-2xl">
        Hold On!, Loading Video Tiles...
      </p>
    </div>
  </main>
</template>- Add the components to App.vue
We subscribe to the selectRoomStarted state to detect changes after the user join the room so that we show the Conference component else the Join component.
<script setup lang="ts">
import { ref } from "vue";
import { selectRoomStarted } from "@100mslive/hms-video-store";
import { hmsStore } from "./hms";
import Join from "./components/Join.vue";
import Conference from "./components/Conference.vue";

const isConnected = ref(false);
const onConnection = (connectionState: boolean | undefined) => {
  isConnected.value = Boolean(connectionState);
};

hmsStore.subscribe(onConnection, selectRoomStarted);
</script>

<template>
  <div class="min-h-full flex flex-col justify-center py-12 sm:px-6 lg:px-8">
    <div class="sm:mx-auto sm:w-full sm:max-w-md">
      <img
        class="mx-auto block h-20 w-auto"
        src="https://www.100ms.live/assets/logo.svg"
        alt="100ms"
      />
      <h2 class="mt-6 text-center text-3xl font-extrabold text-white">
        Kofi Mupati Video Call Meeting
      </h2>
    </div>
    <Conference v-if="isConnected" />
    <Join v-else />
  </div>
</template>
Add Environment variables
Update the following environment variables in the .env file. Note that I've set a default room name to prevent room creation every time we try to join a video chat.
For other people to join the video chat, they must use the same room name.
ROOM_URL=https://prod-in2.100ms.live/api/v2/rooms
APP_ACCESS_KEY=your_hms_app_access_key
APP_SECRET=your_hms_app_secret
VITE_APP_DEFAULT_ROOM=kofi_mupati_secret_room
Testing the Application
-
Run the application locally with the Netlify-cli. The application will open on the following port: http://localhost:8888/
ntl dev -
Open two browsers. One should be in the regular mode and the other incognito and open the link the application will run on.
-
Enter your username and join the video chat.
For visual learners, the following video explains and demonstrates the application:
Conclusion
You can find the complete project repository here. For me the, the ability to simply subscribe to specific states makes the 100ms SDKs very easy to use. The type definitions are great, documentations are simple and provide a very good developer experience.
I hope this tutorial is a very welcoming introduction to the 100ms platform and I look forward to the amazing applications you are going to build.